
🎯 Who this is for: Customer care and service users (Service seats and Sales & Service seats) who handle service enquiries in the HubSpot Help Desk. Core users can create and update tickets, but they do not have the Help Desk workspace, SLA timers or the knowledge base. If you cannot see the Help Desk, ask your HubSpot admin.
🔗
Quick links: Training portal | Services Team Training playlist
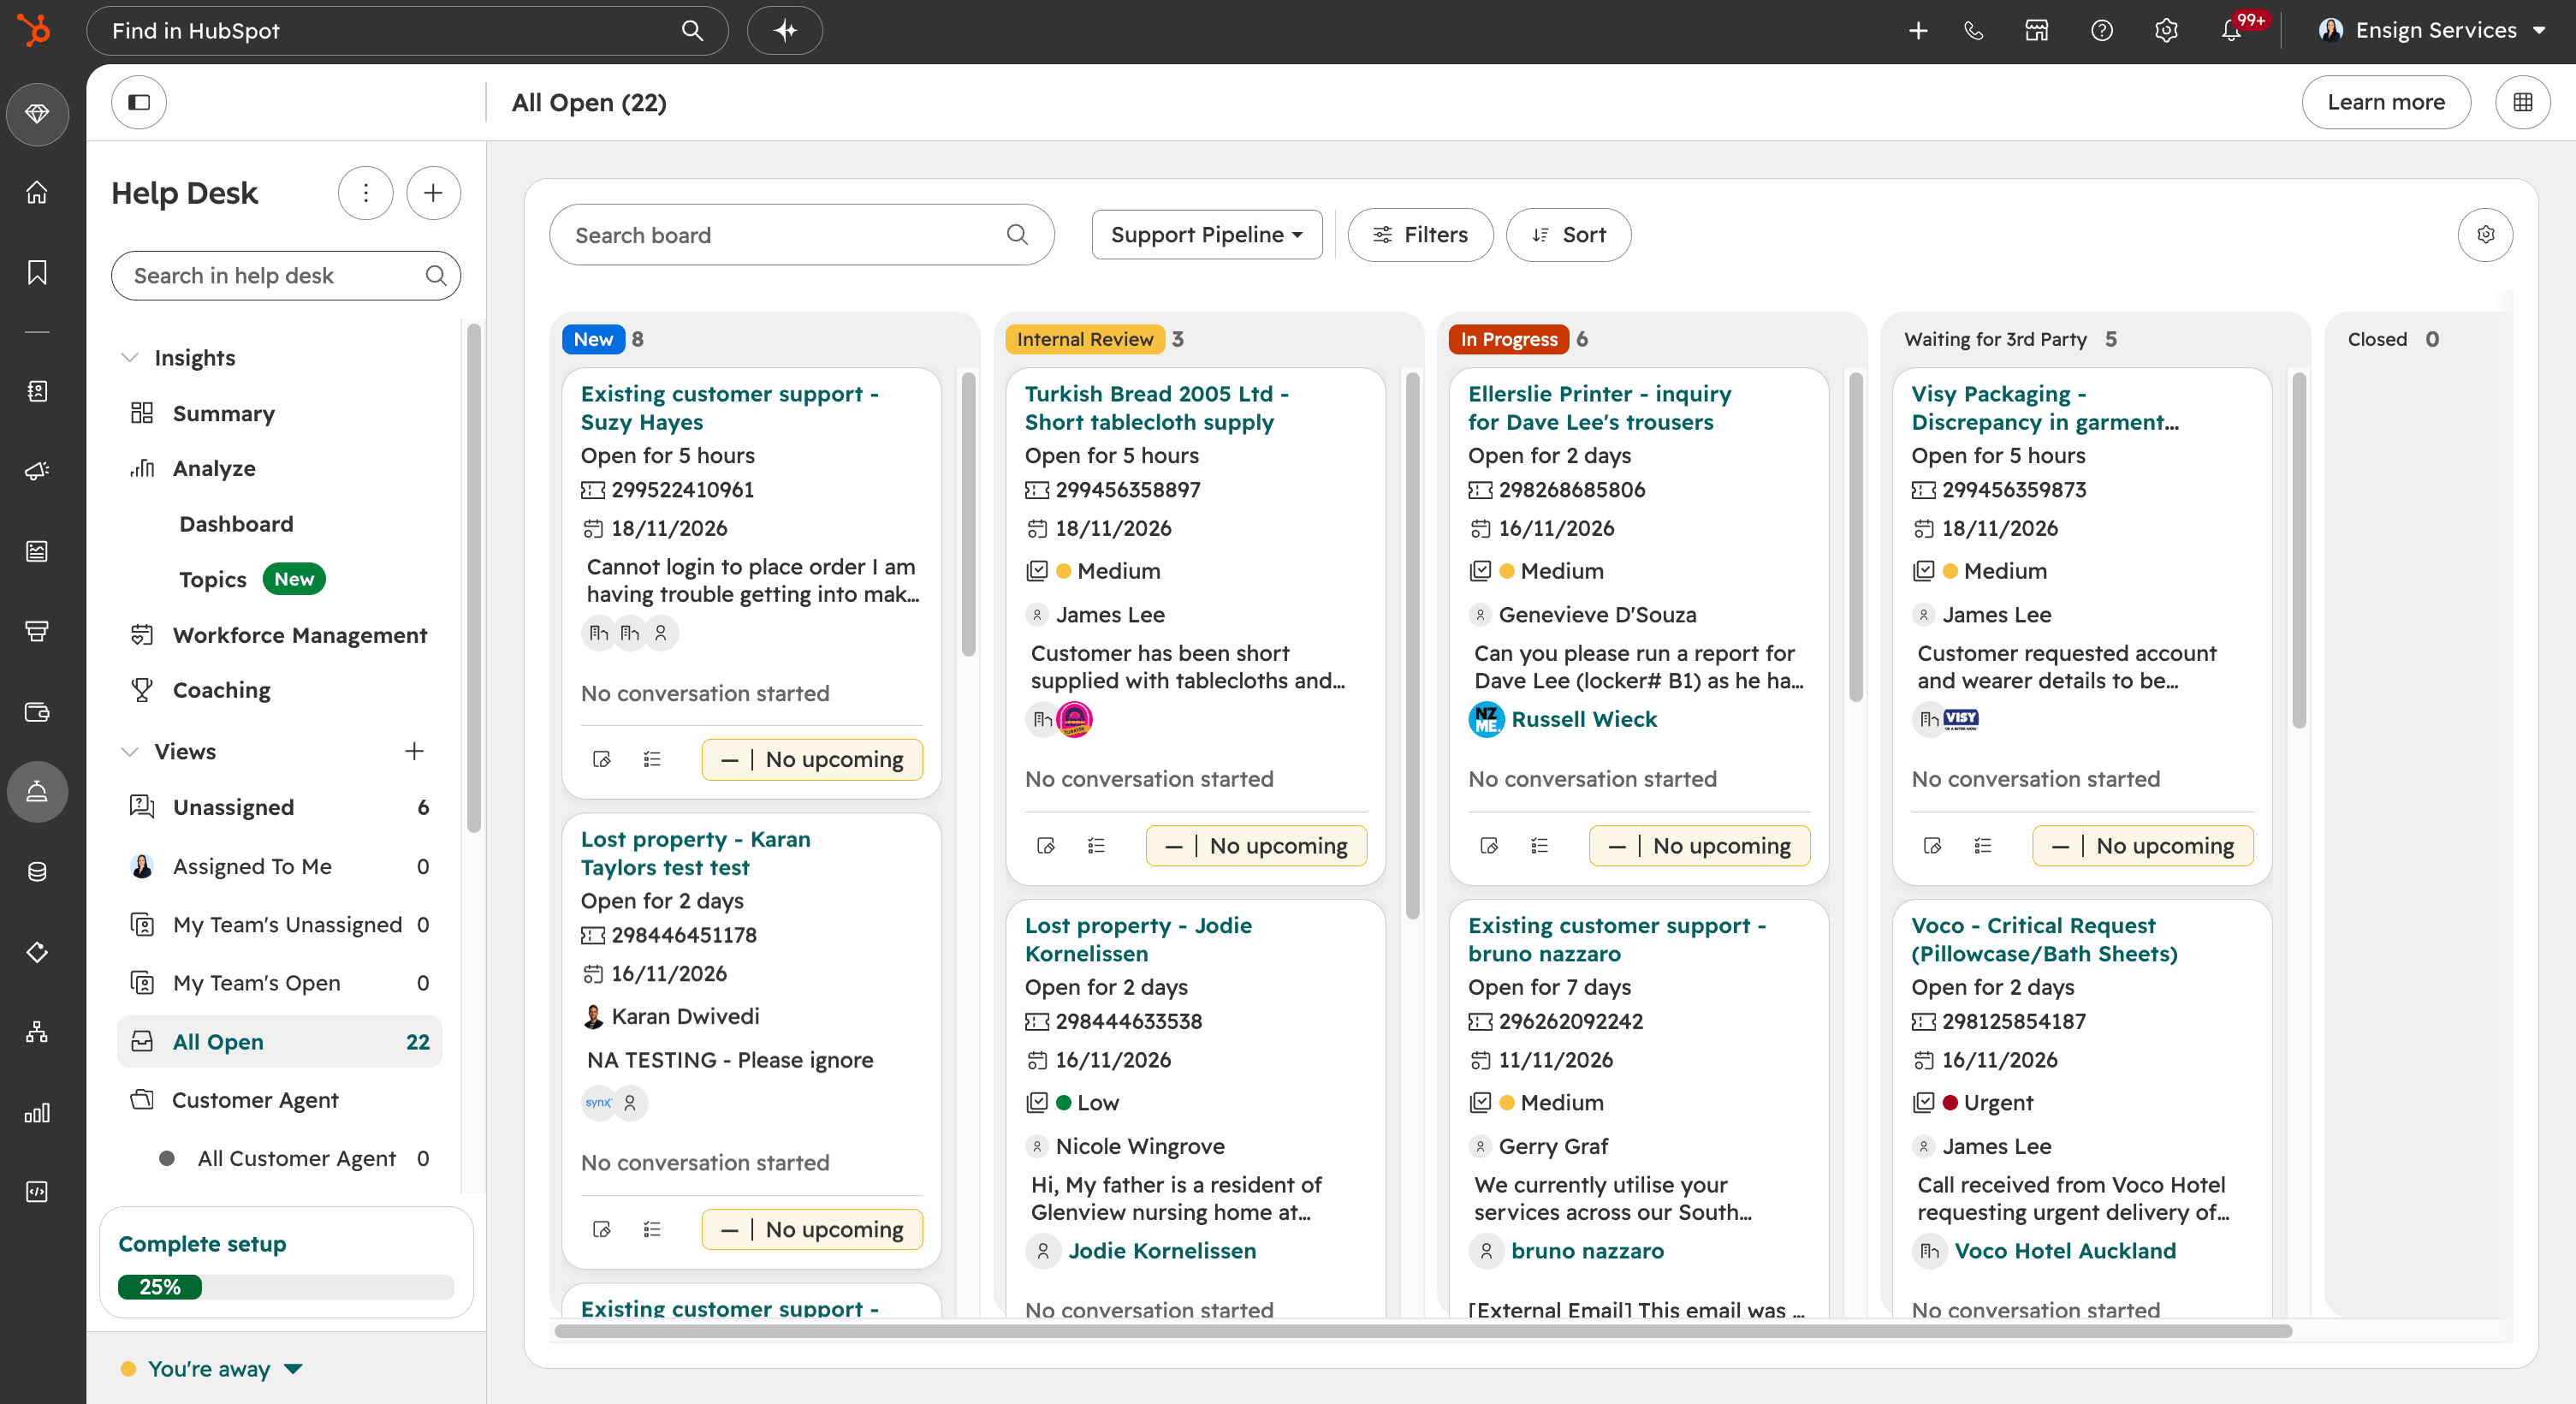
How service enquiries come in
Customers contact Ensign about their service in a few different ways. Whichever way the enquiry arrives, the aim is the same: it ends up as a ticket in HubSpot so it can be tracked, owned and closed.
| How it arrives | What happens |
|---|---|
| Customer request form on the website | A ticket is created automatically in the New stage. |
| Shared customer care email | The email arrives in the Help Desk. Review it and decide if it needs a ticket. |
| Phone call to the customer care line or an account manager | Create a ticket manually while you are on the call or straight after. |
Each team has its own shared customer care email, and some customers email their account manager directly. Tickets can be for Ensign (Australia) or Taylors (New Zealand), so always check the brand.
The customer request form
Customers use a centralised customer request form on the website. They fill in:
- First name
- Last name
- Service point location
- Type
- Request message
When the form is submitted, HubSpot creates the ticket for you.
IMAGE FOR SYNX TO ADD
Triage: is it a ticket or a sales opportunity?
When an enquiry comes in through the form or the shared email, review it first. There are two outcomes:
- A service issue: create or work a ticket.
- A sales opportunity: for example a customer asking for additional products or services. Pass it to the account manager or sales so a lead or deal can be created.
Creating a ticket Automatically from the form
When a customer submits the request form, the ticket is created in the New stage. Your job is to pick it up, check the details and make sure it has an owner.
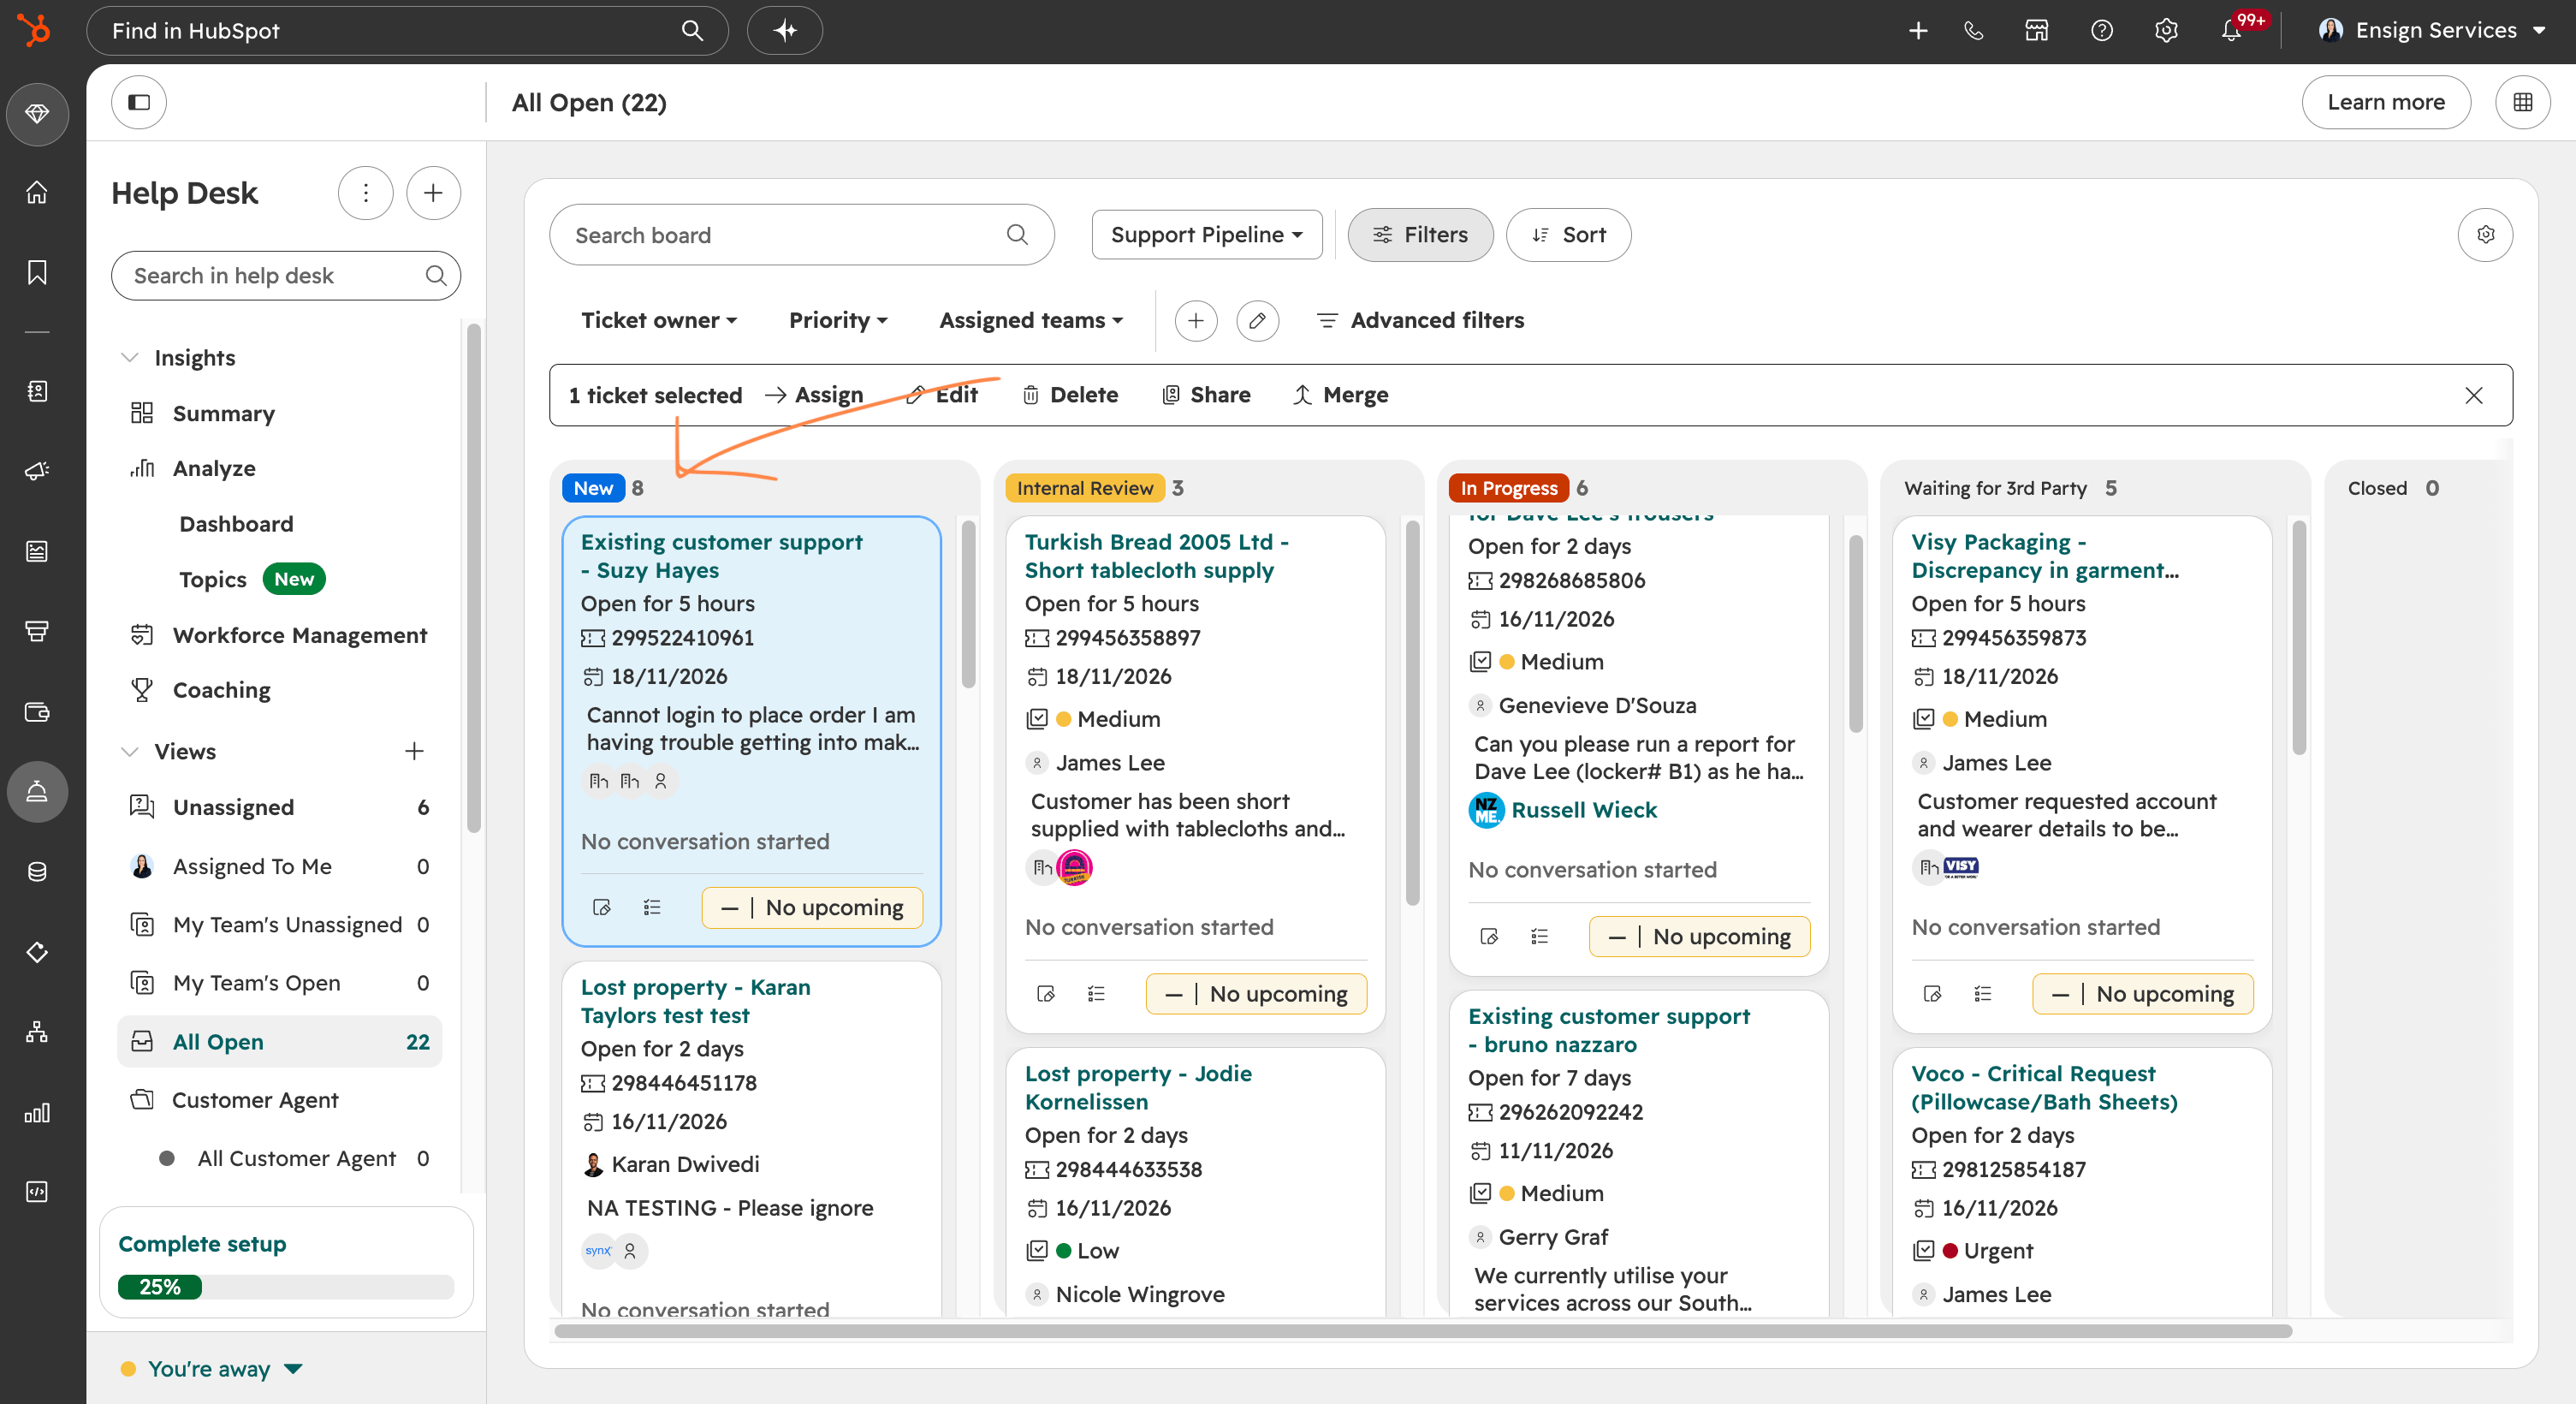
Manually
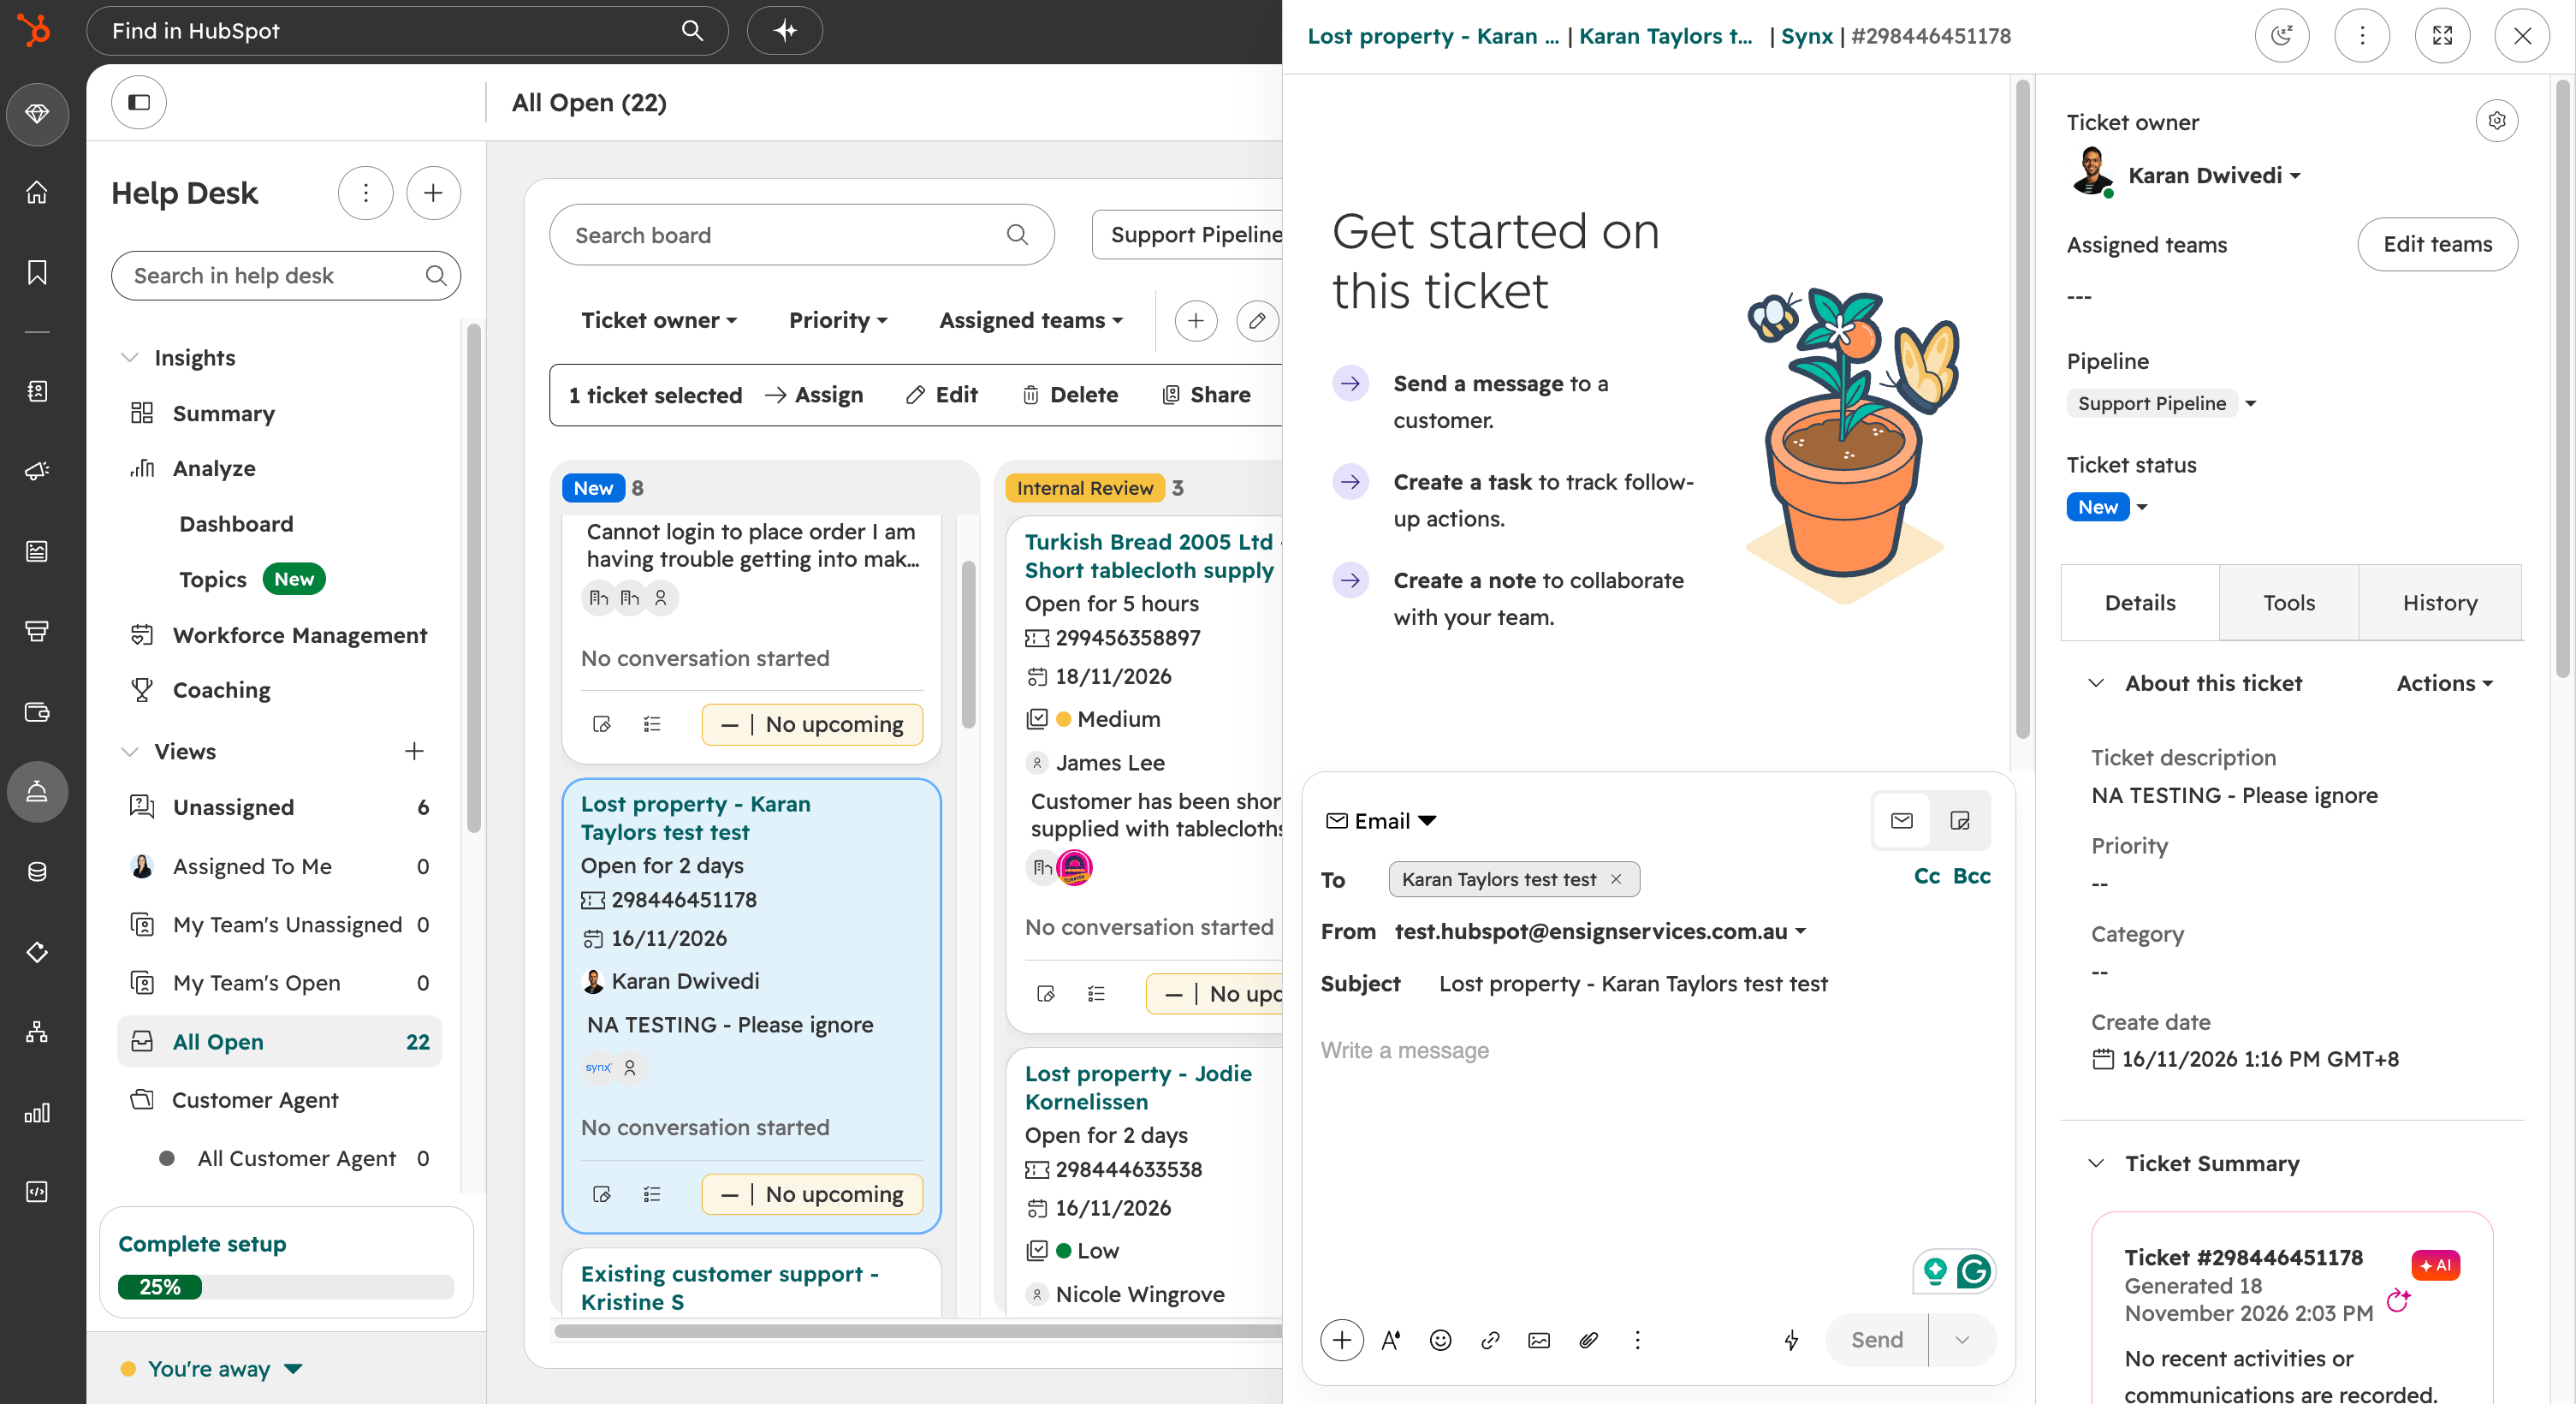
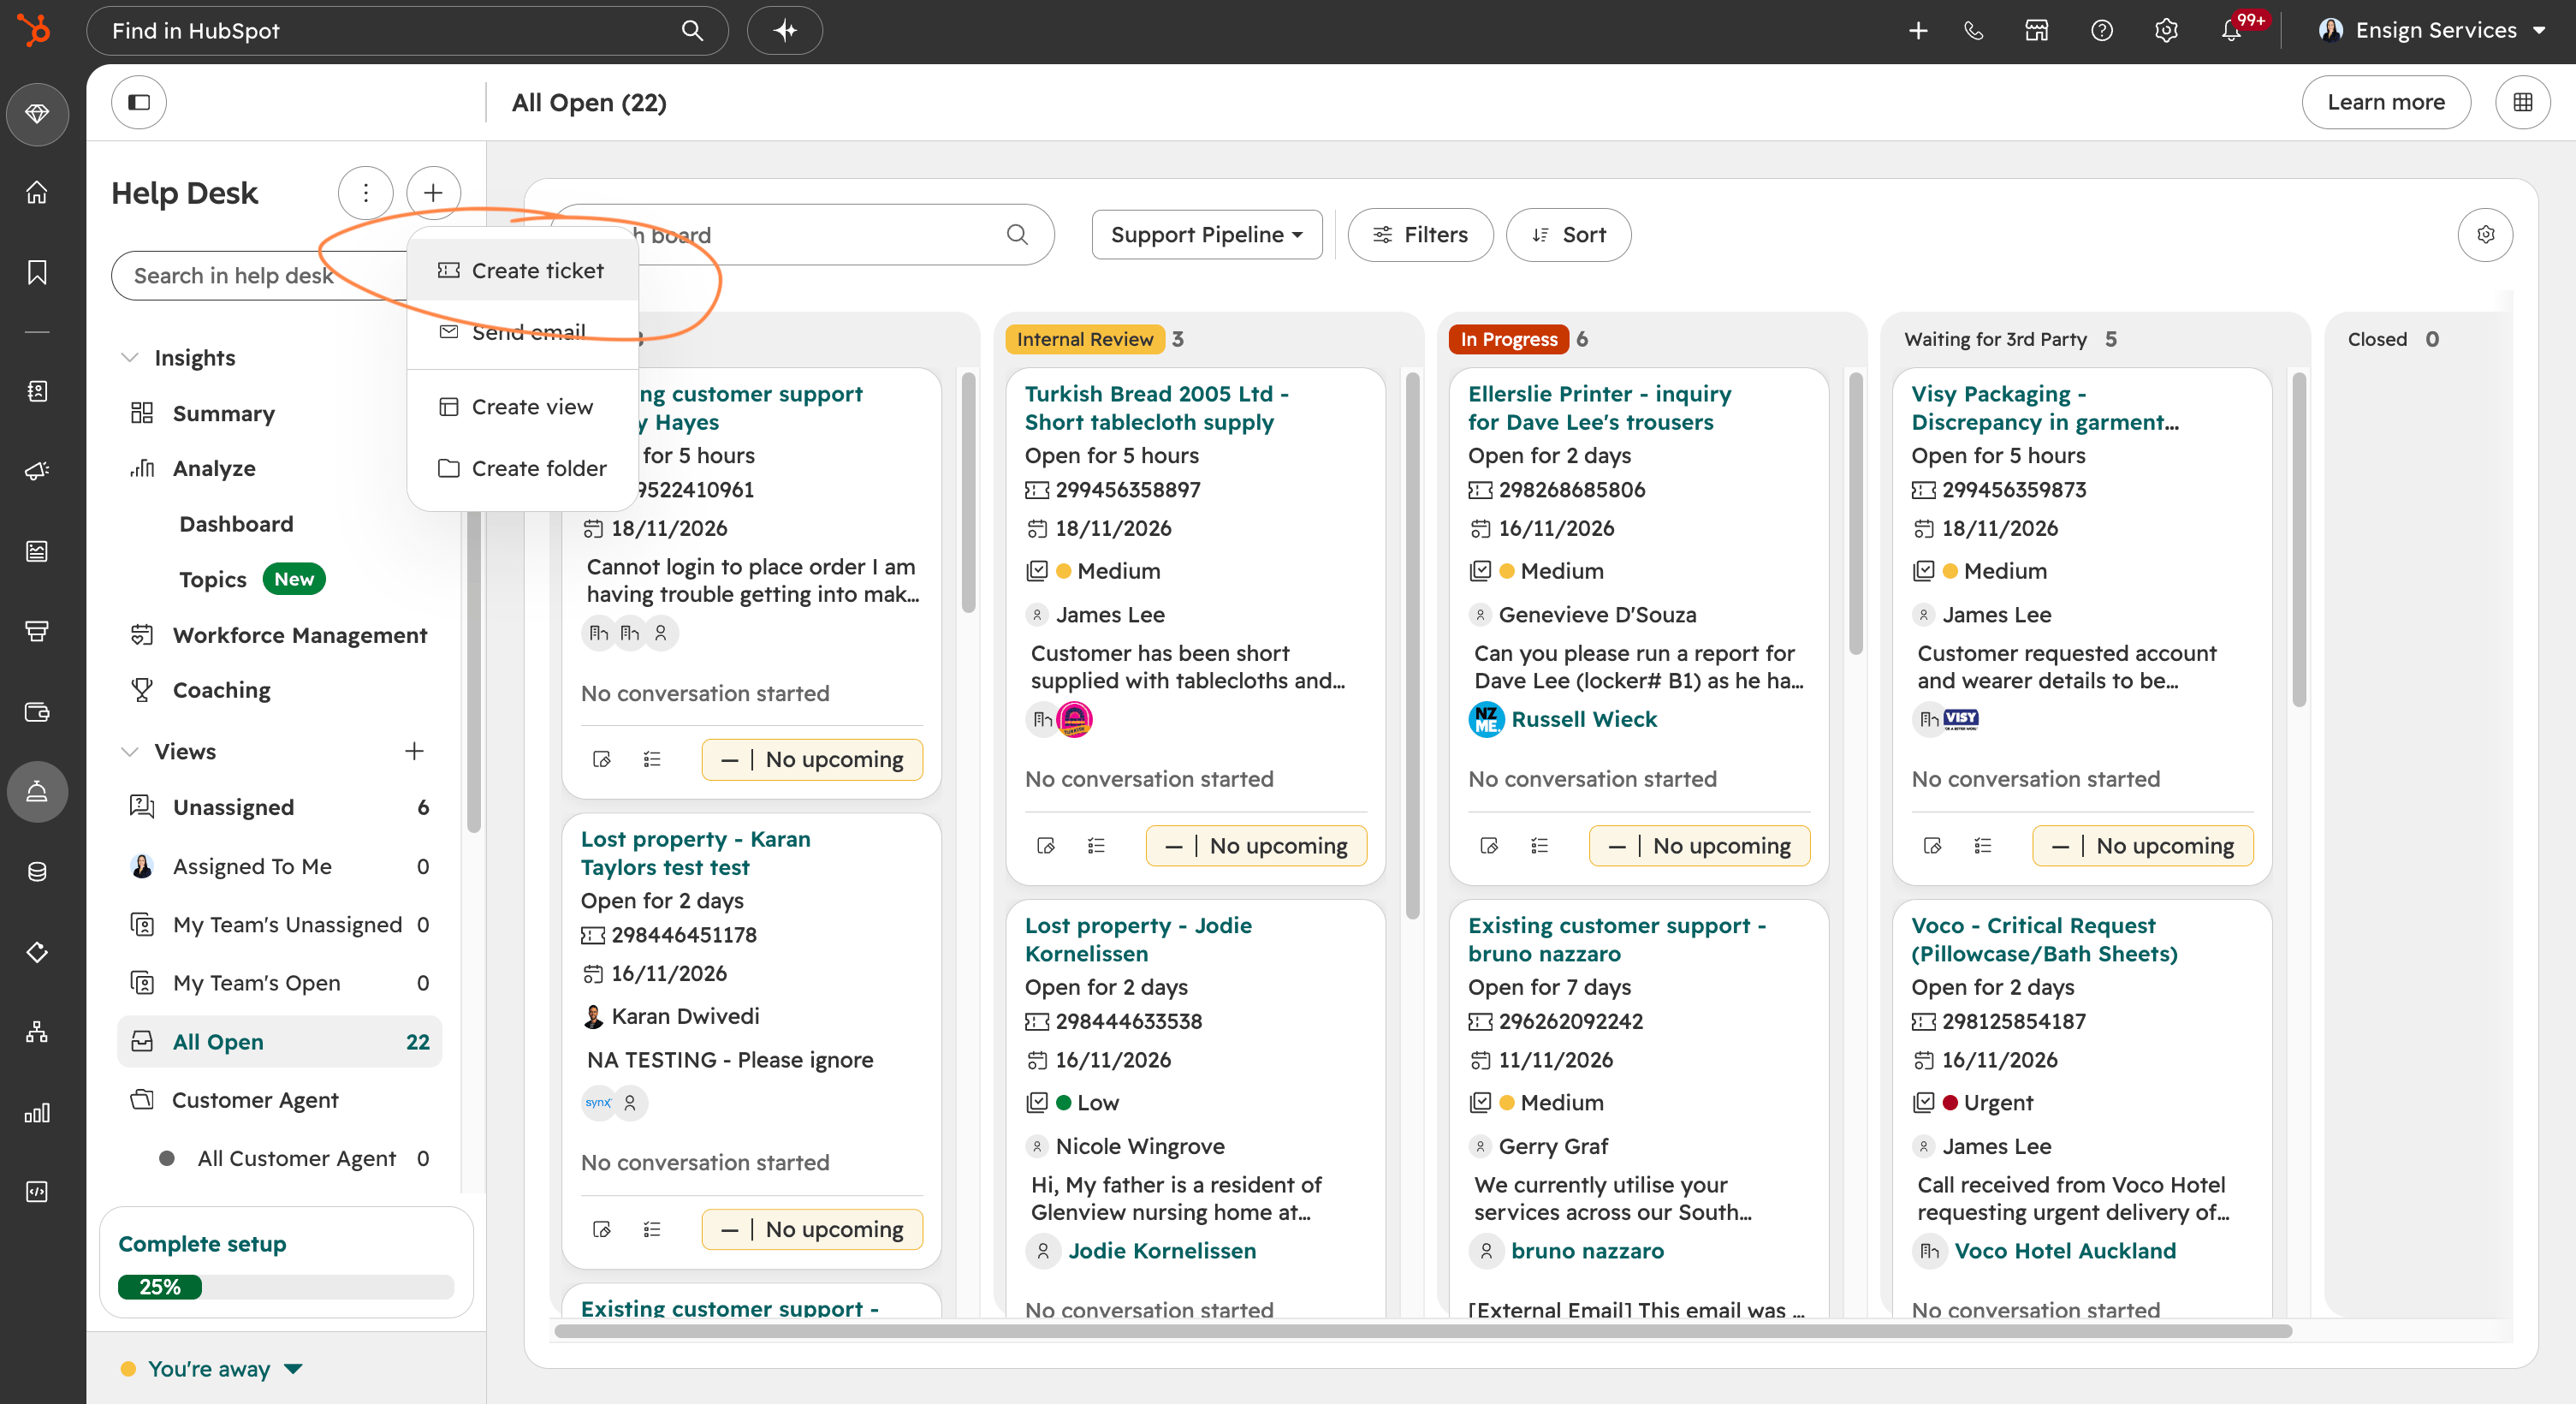
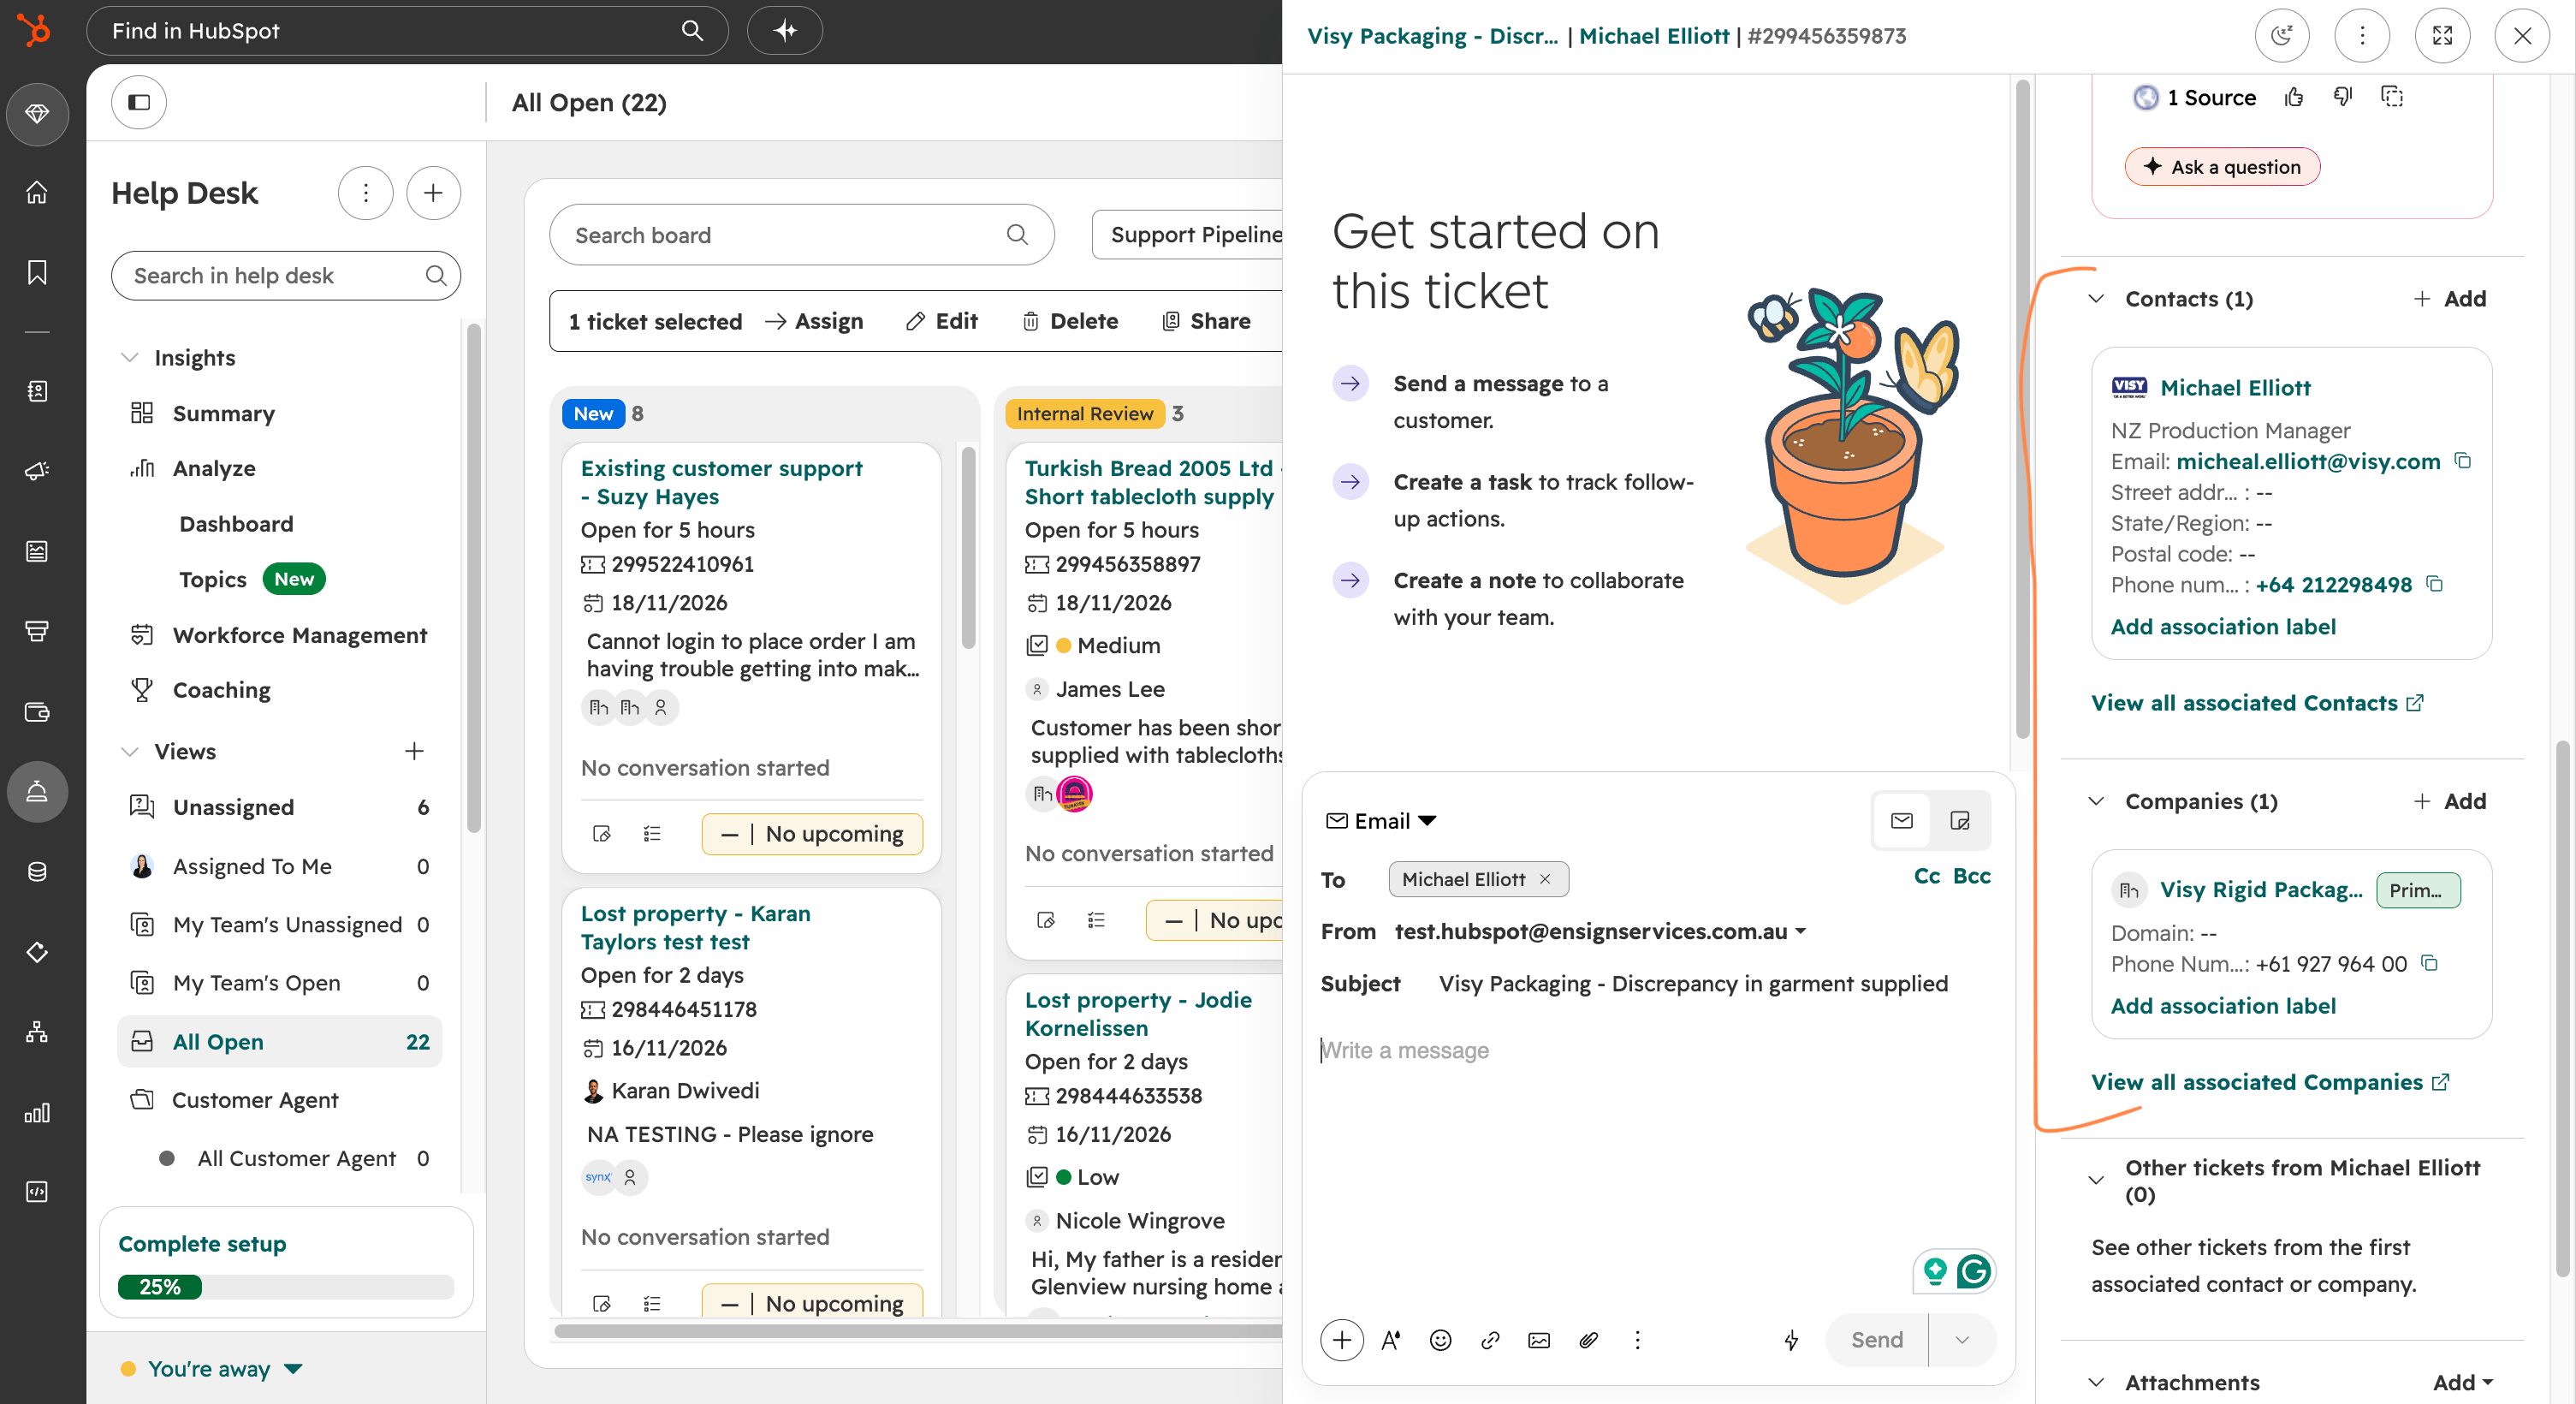
If a customer rings or emails, create the ticket yourself. The best place to do this is from the contact record, so the ticket is linked to the right person and company.
- Open the contact record.
- In the tickets section on the right-hand side, click Add to create a ticket.
- Fill in the ticket details (see below).
- Click Create.
⚠️
Always make sure the ticket is associated with the company as well as the contact. If a new contact from an existing company gets in touch, link them to the company. This is how the customer's account details come through on the ticket.
Ticket details to fill in
Some details are required before a ticket can move out of a stage.
| Stage | Required | Optional |
|---|---|---|
| New | Type or category, brand, department, service point location | None |
| Internal Review | Owner, priority | Tier |
| In Progress | None | TRS number, NetSuite number (where relevant to the issue) |
| Closed | Closed date, outcome | Outcome details, CSAT |
The tier is the customer's tier from their company record. It is carried onto the ticket so it can be used for SLAs and reporting.
The other details you can record are:
- Case type: the kind of issue, for example late delivery, missed delivery, shortages, quality and rejects or price error.
- Case issue: the specific issue, for example delivery, quantity, quality, lost property, invoice error or soiled collection.
- Case origin: how the enquiry arrived, for example email, phone, JSR, serviceperson, production, stores or account manager.
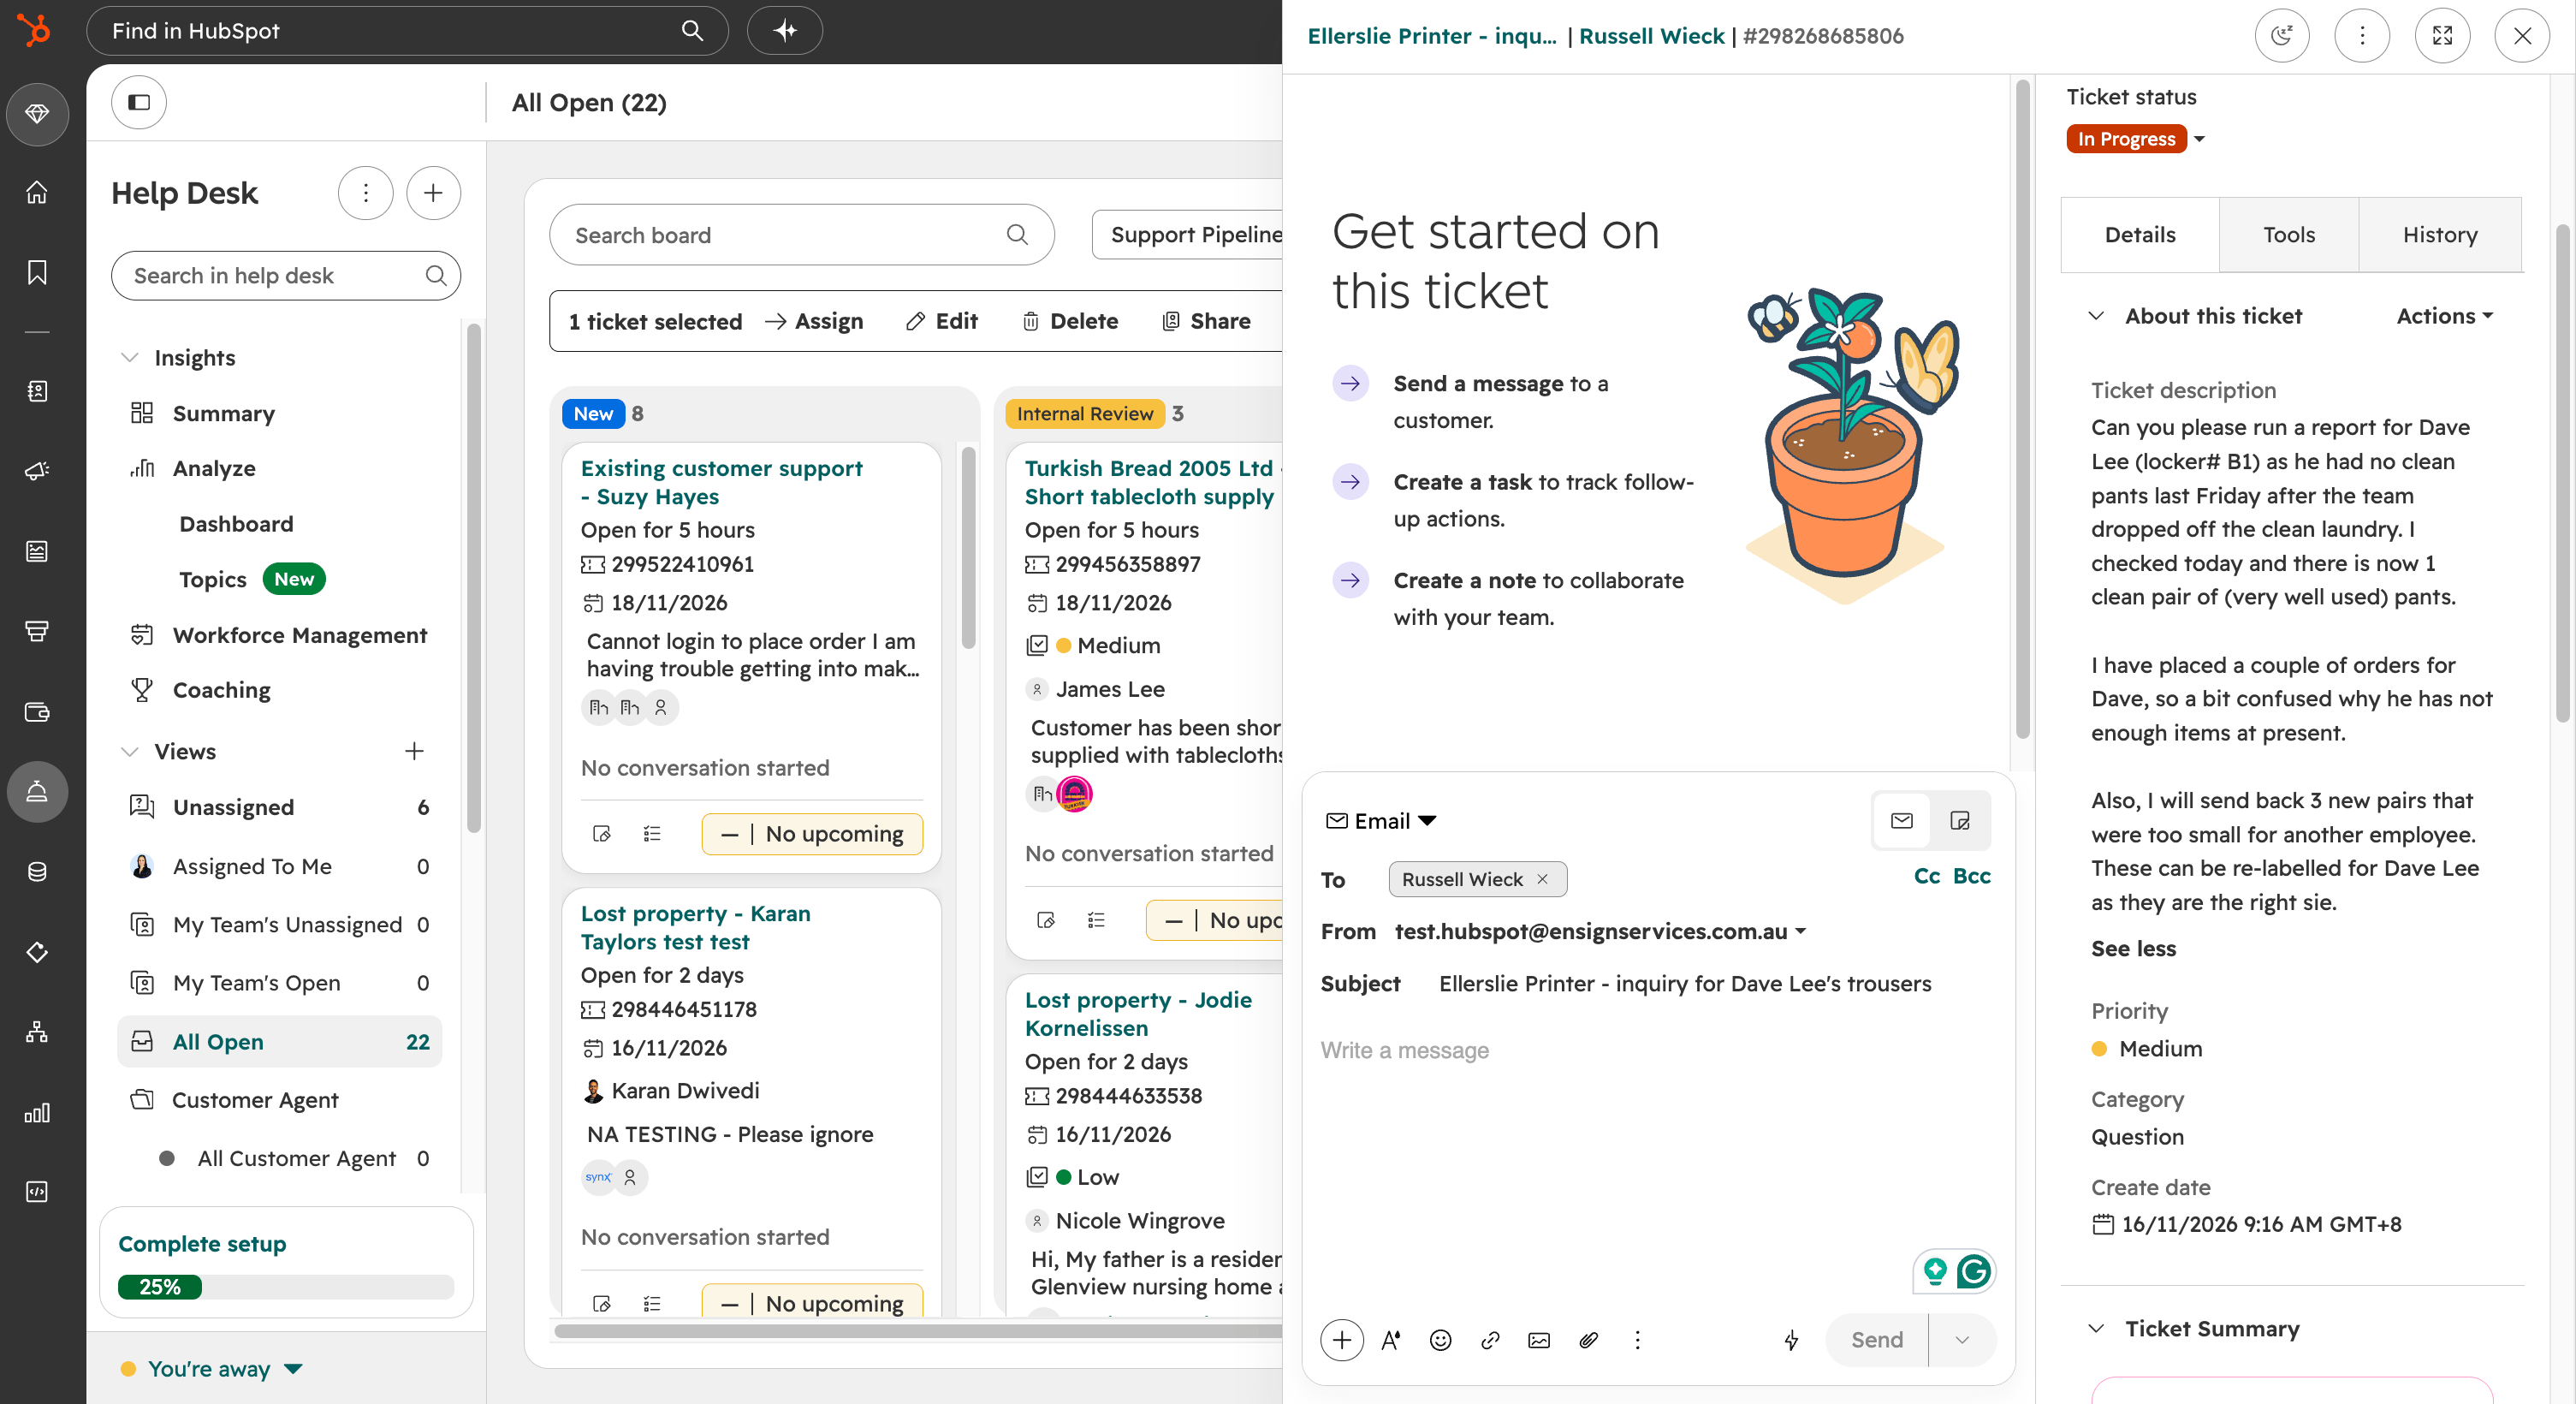
Type or category
Choose the type or category for the enquiry:
- Question
- Concern
- Problem
- Size exchange
- New wearer
- Special delivery
Ticket stages
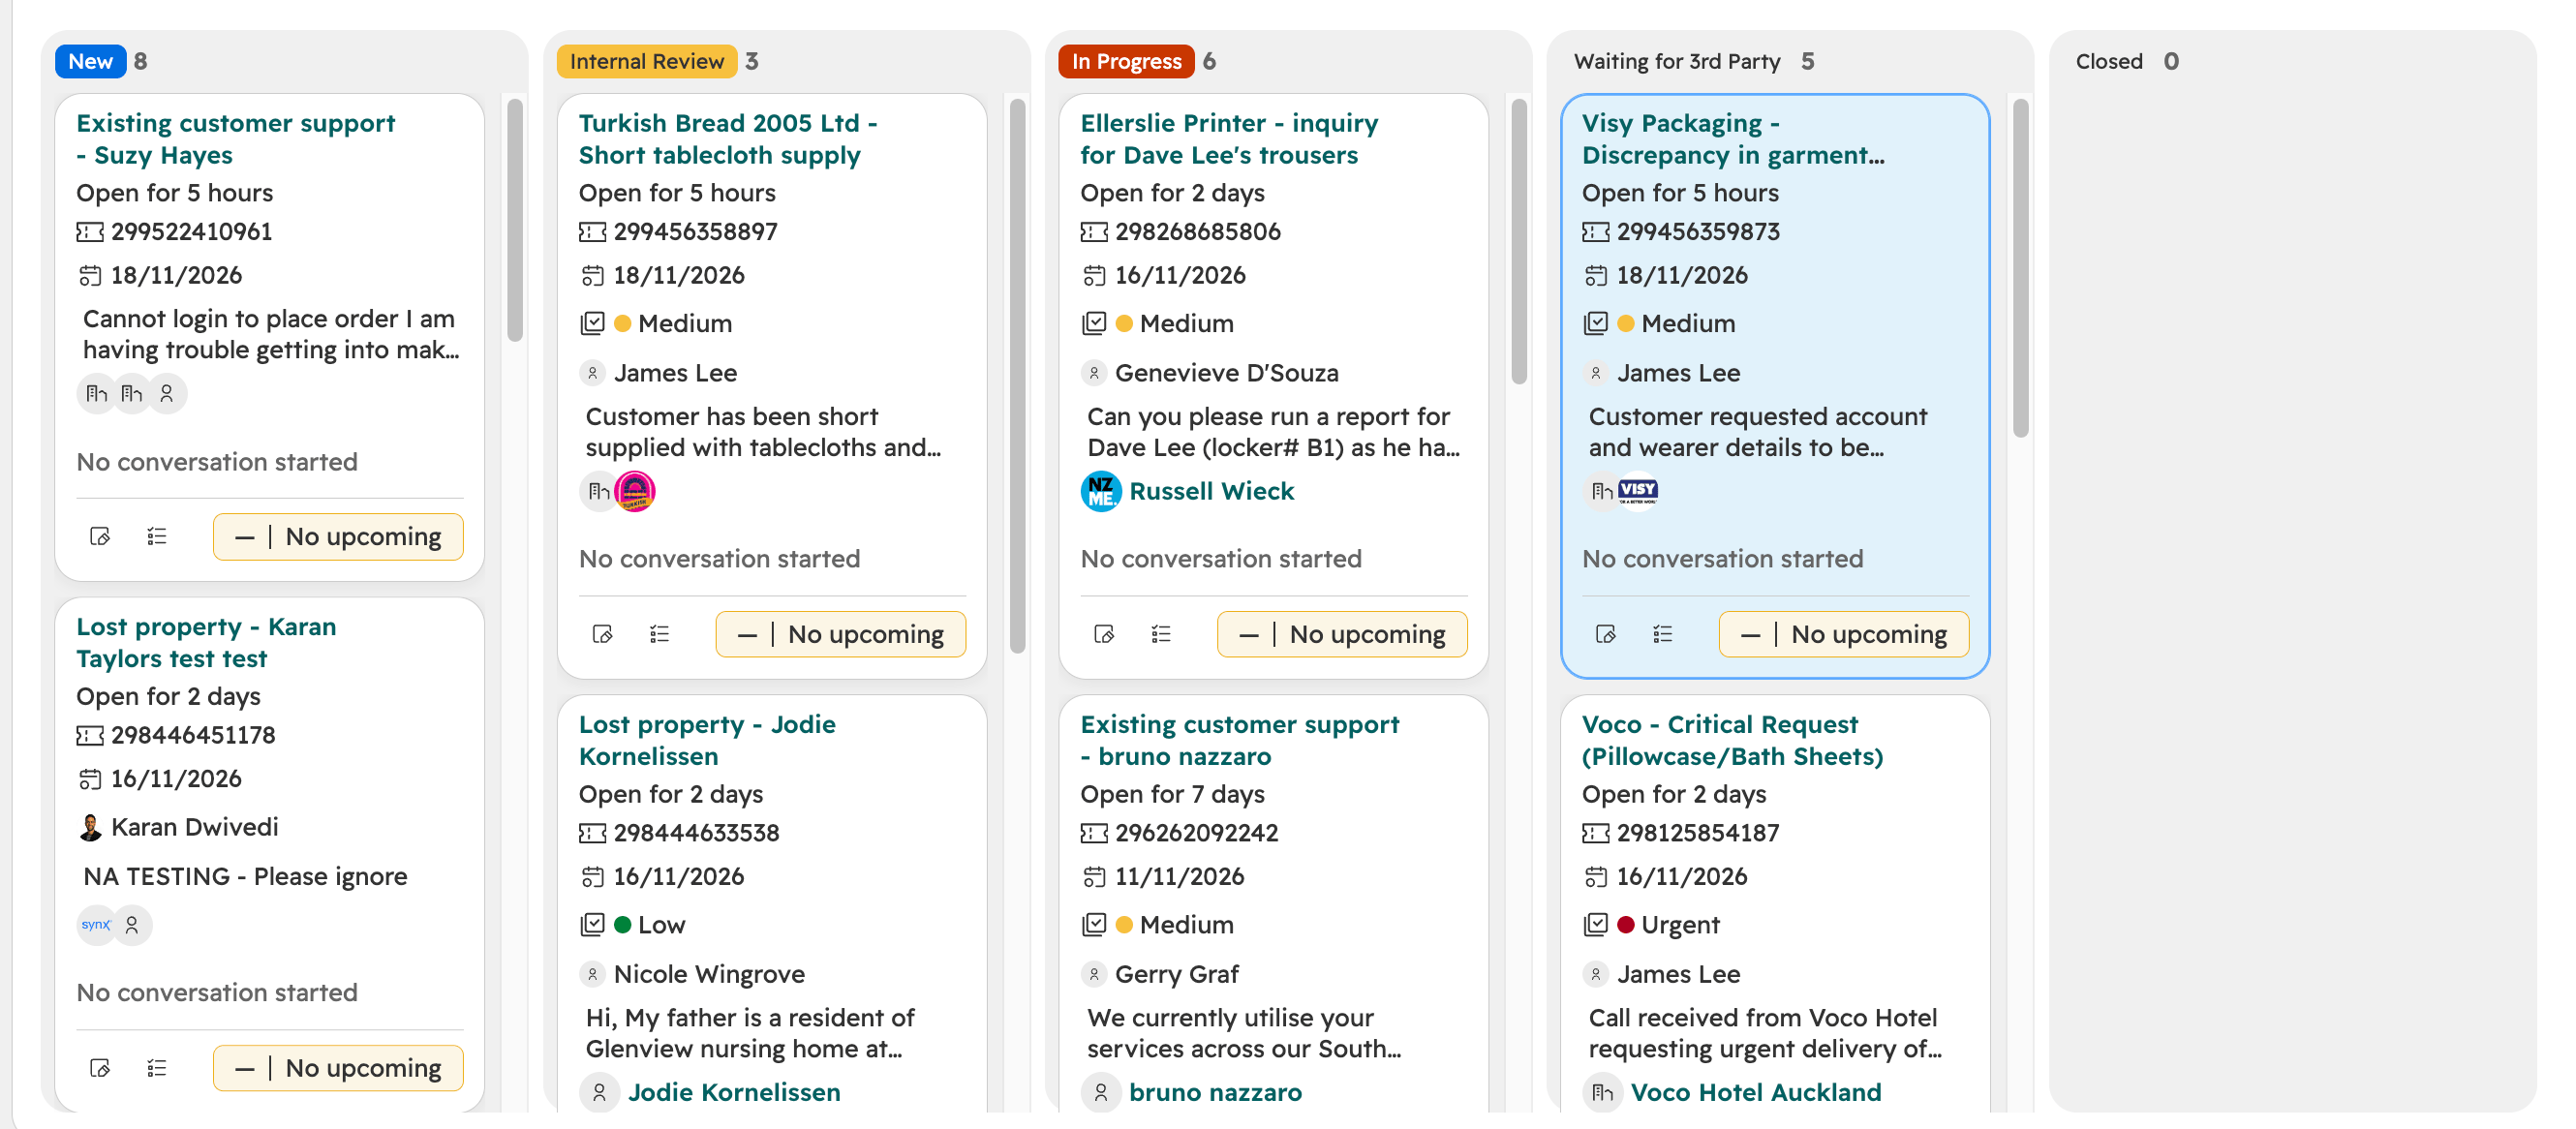
Every ticket moves through these stages.
| Stage | What it means | What you do |
|---|---|---|
| New | A ticket has been created, usually automatically from the customer request form, and is waiting to be picked up. | Pick up the ticket, check the details and make sure it has an owner. |
| Internal Review | A customer care team member is reviewing the ticket to understand the issue. | Read the ticket, set the owner and the priority. |
| In Progress | The team member has responded and is actively working on the case. | Reply to the customer and work the case. |
| Waiting for 3rd Party | The case is on hold until an outside party, such as a supplier or another team, resolves their part. | Keep the ticket here only while you are genuinely waiting. Follow up when you can. |
| Closed | The issue is resolved, and the outcome and closed date are recorded. | Fill in the closed date and outcome, then close the ticket. |
Who gets the ticket
To begin with, tickets are assigned to an owner manually. Over time, assigning will be automated:
- Phase 1: manual assigning.
- Phase 2: assigning by state.
- Phase 3: Tier 1 customers go to their account manager.
You will be told when each phase goes live.
Priority
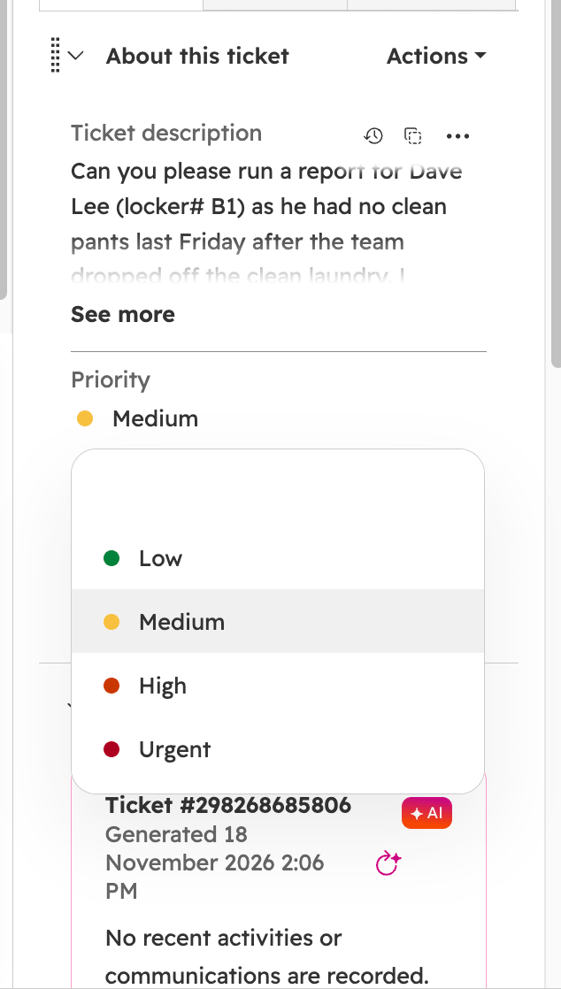
Set a priority on every ticket during Internal Review, so the team knows what to tackle first. The priority levels are:
- Low
- Medium
- High
- Urgent
SLA timers
Service tickets have SLA timers, which count down how long you have to respond and to resolve the ticket. The ticket carries the customer's tier, which is used for SLAs and reporting.
- Keep an eye on the timer on each ticket.
- Tickets that are at risk or overdue are flagged so the team can spot them.
IMAGE FOR SYNX TO ADD:
Working a ticket in the Help Desk
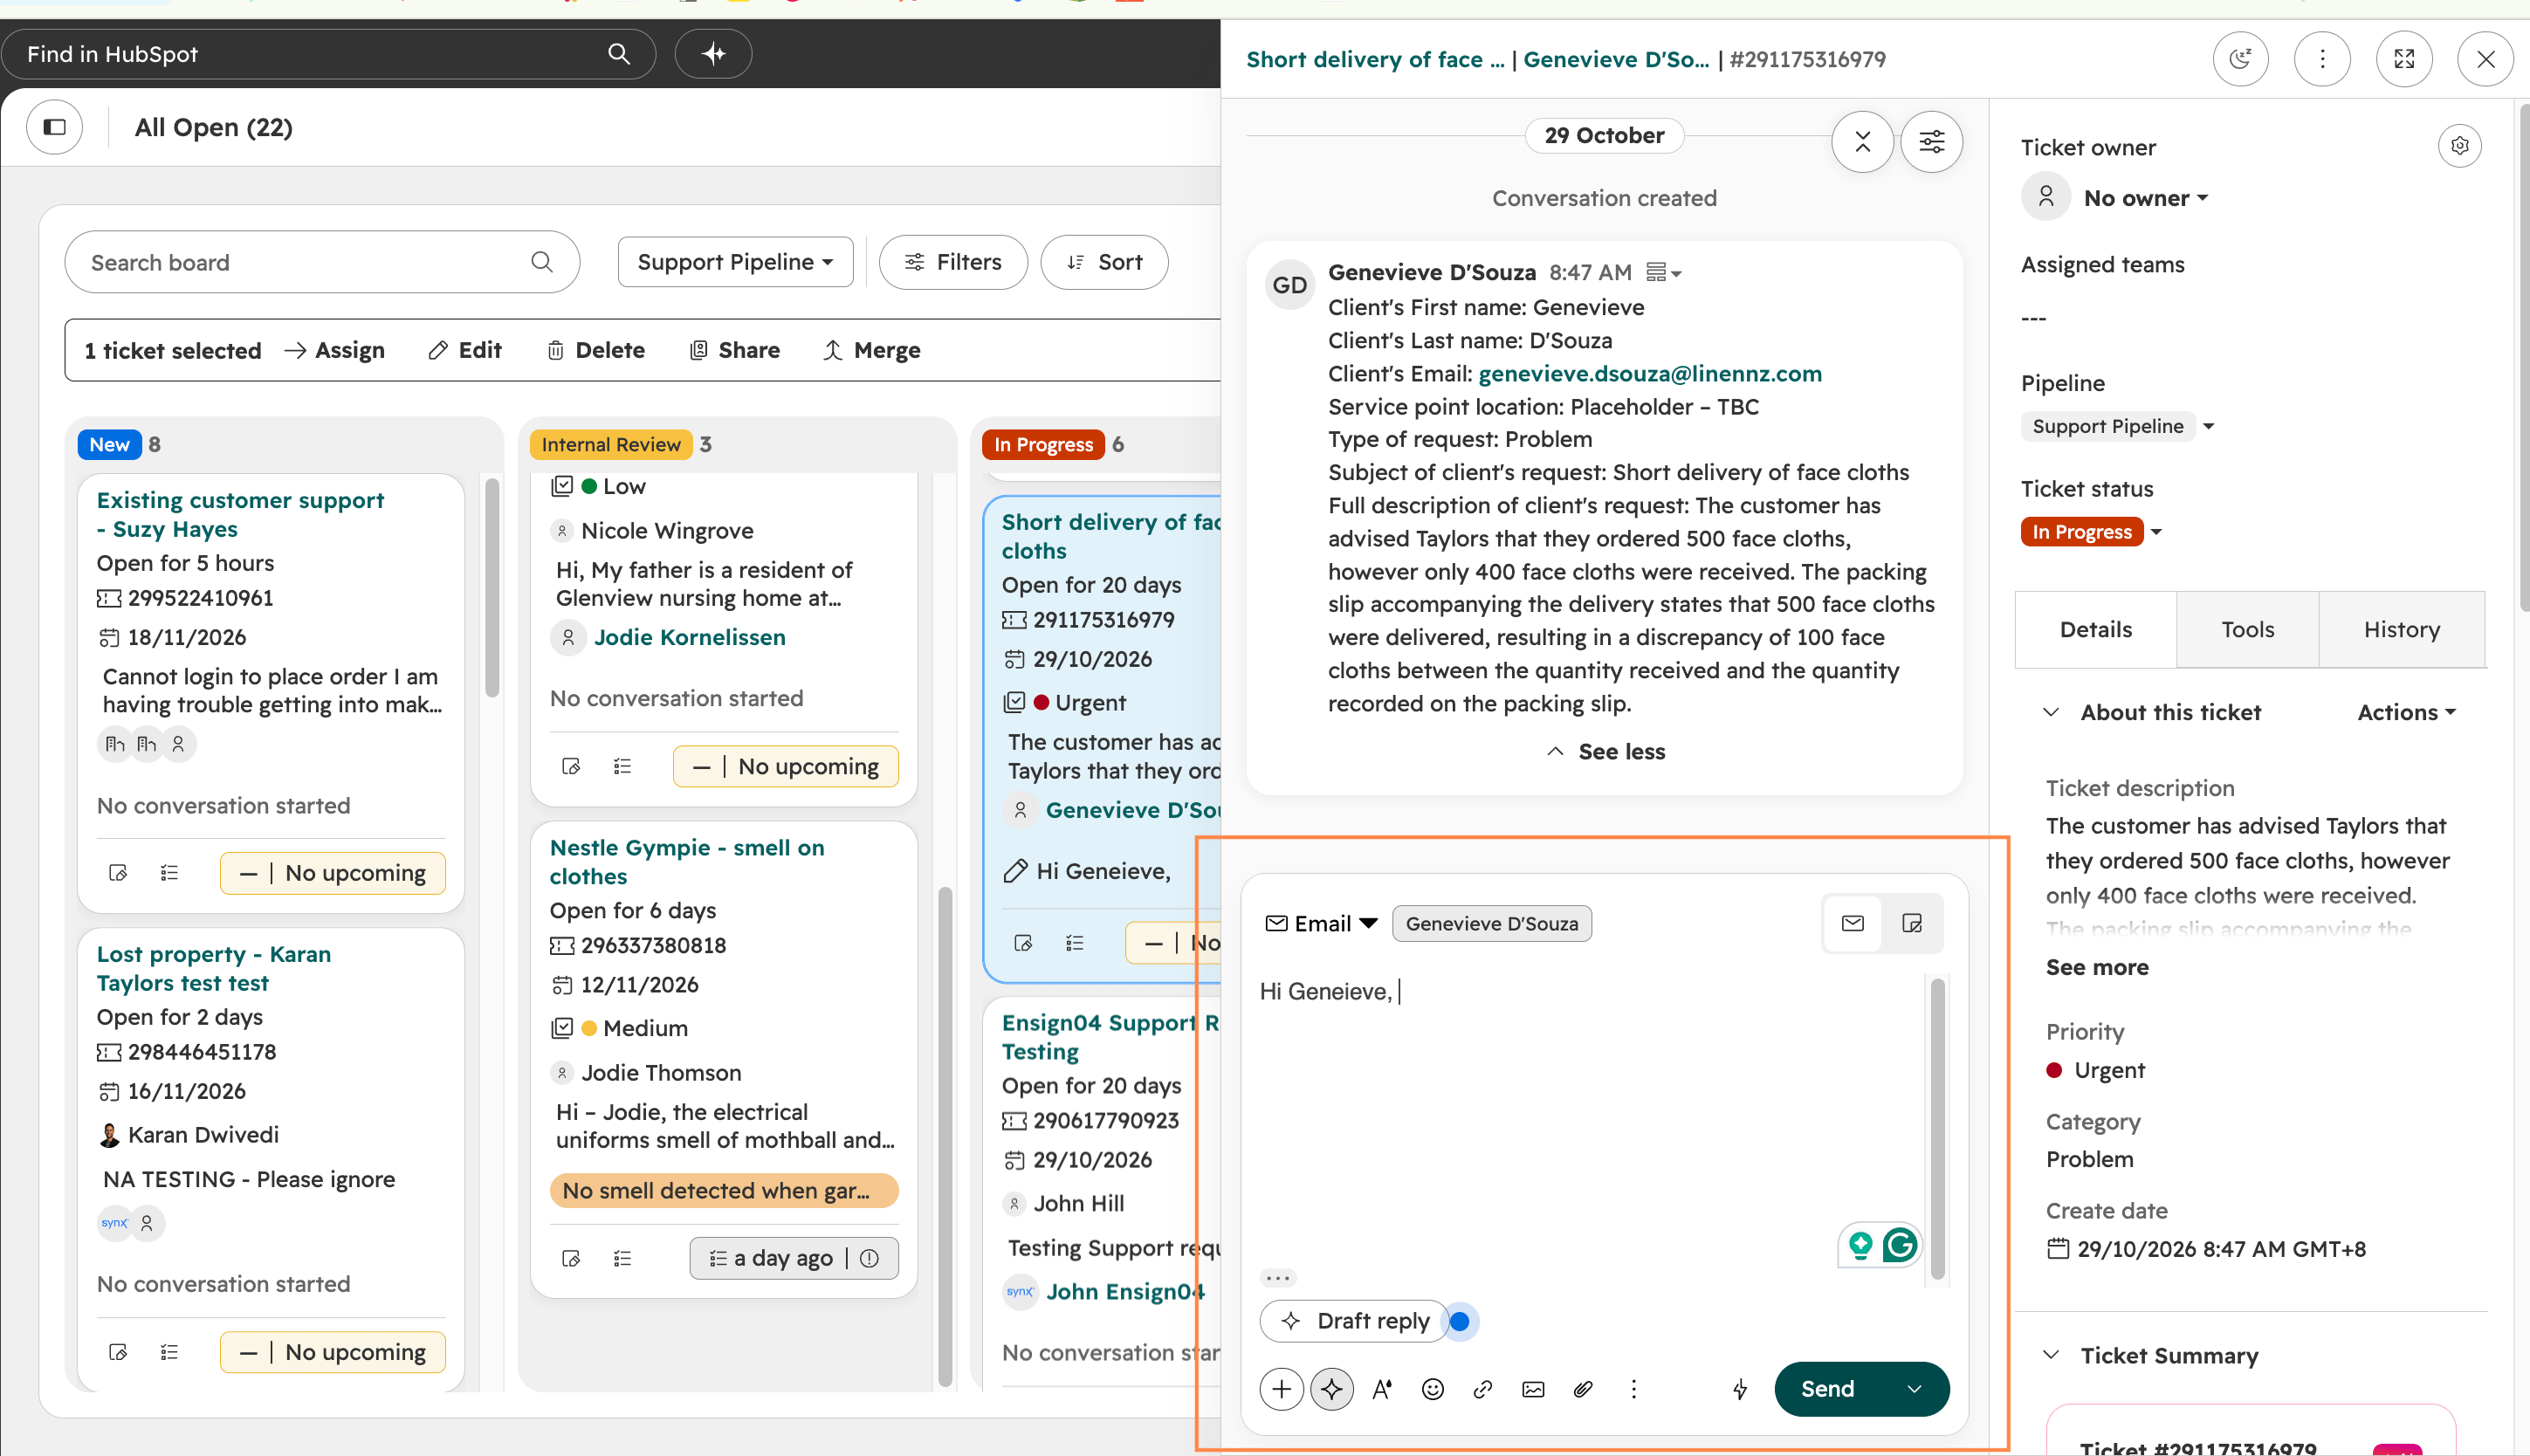
When you work a ticket you can:
- Reply to the customer by email from the Help Desk.
- Add an internal comment to talk to your team without the customer seeing it.
- Reassign the ticket to another team member.
- Use knowledge base articles in your replies, where they are available.
- Log any calls you make against the ticket.
Log everything on the ticket, so anyone picking it up later can see exactly what has happened.
Closing a ticket
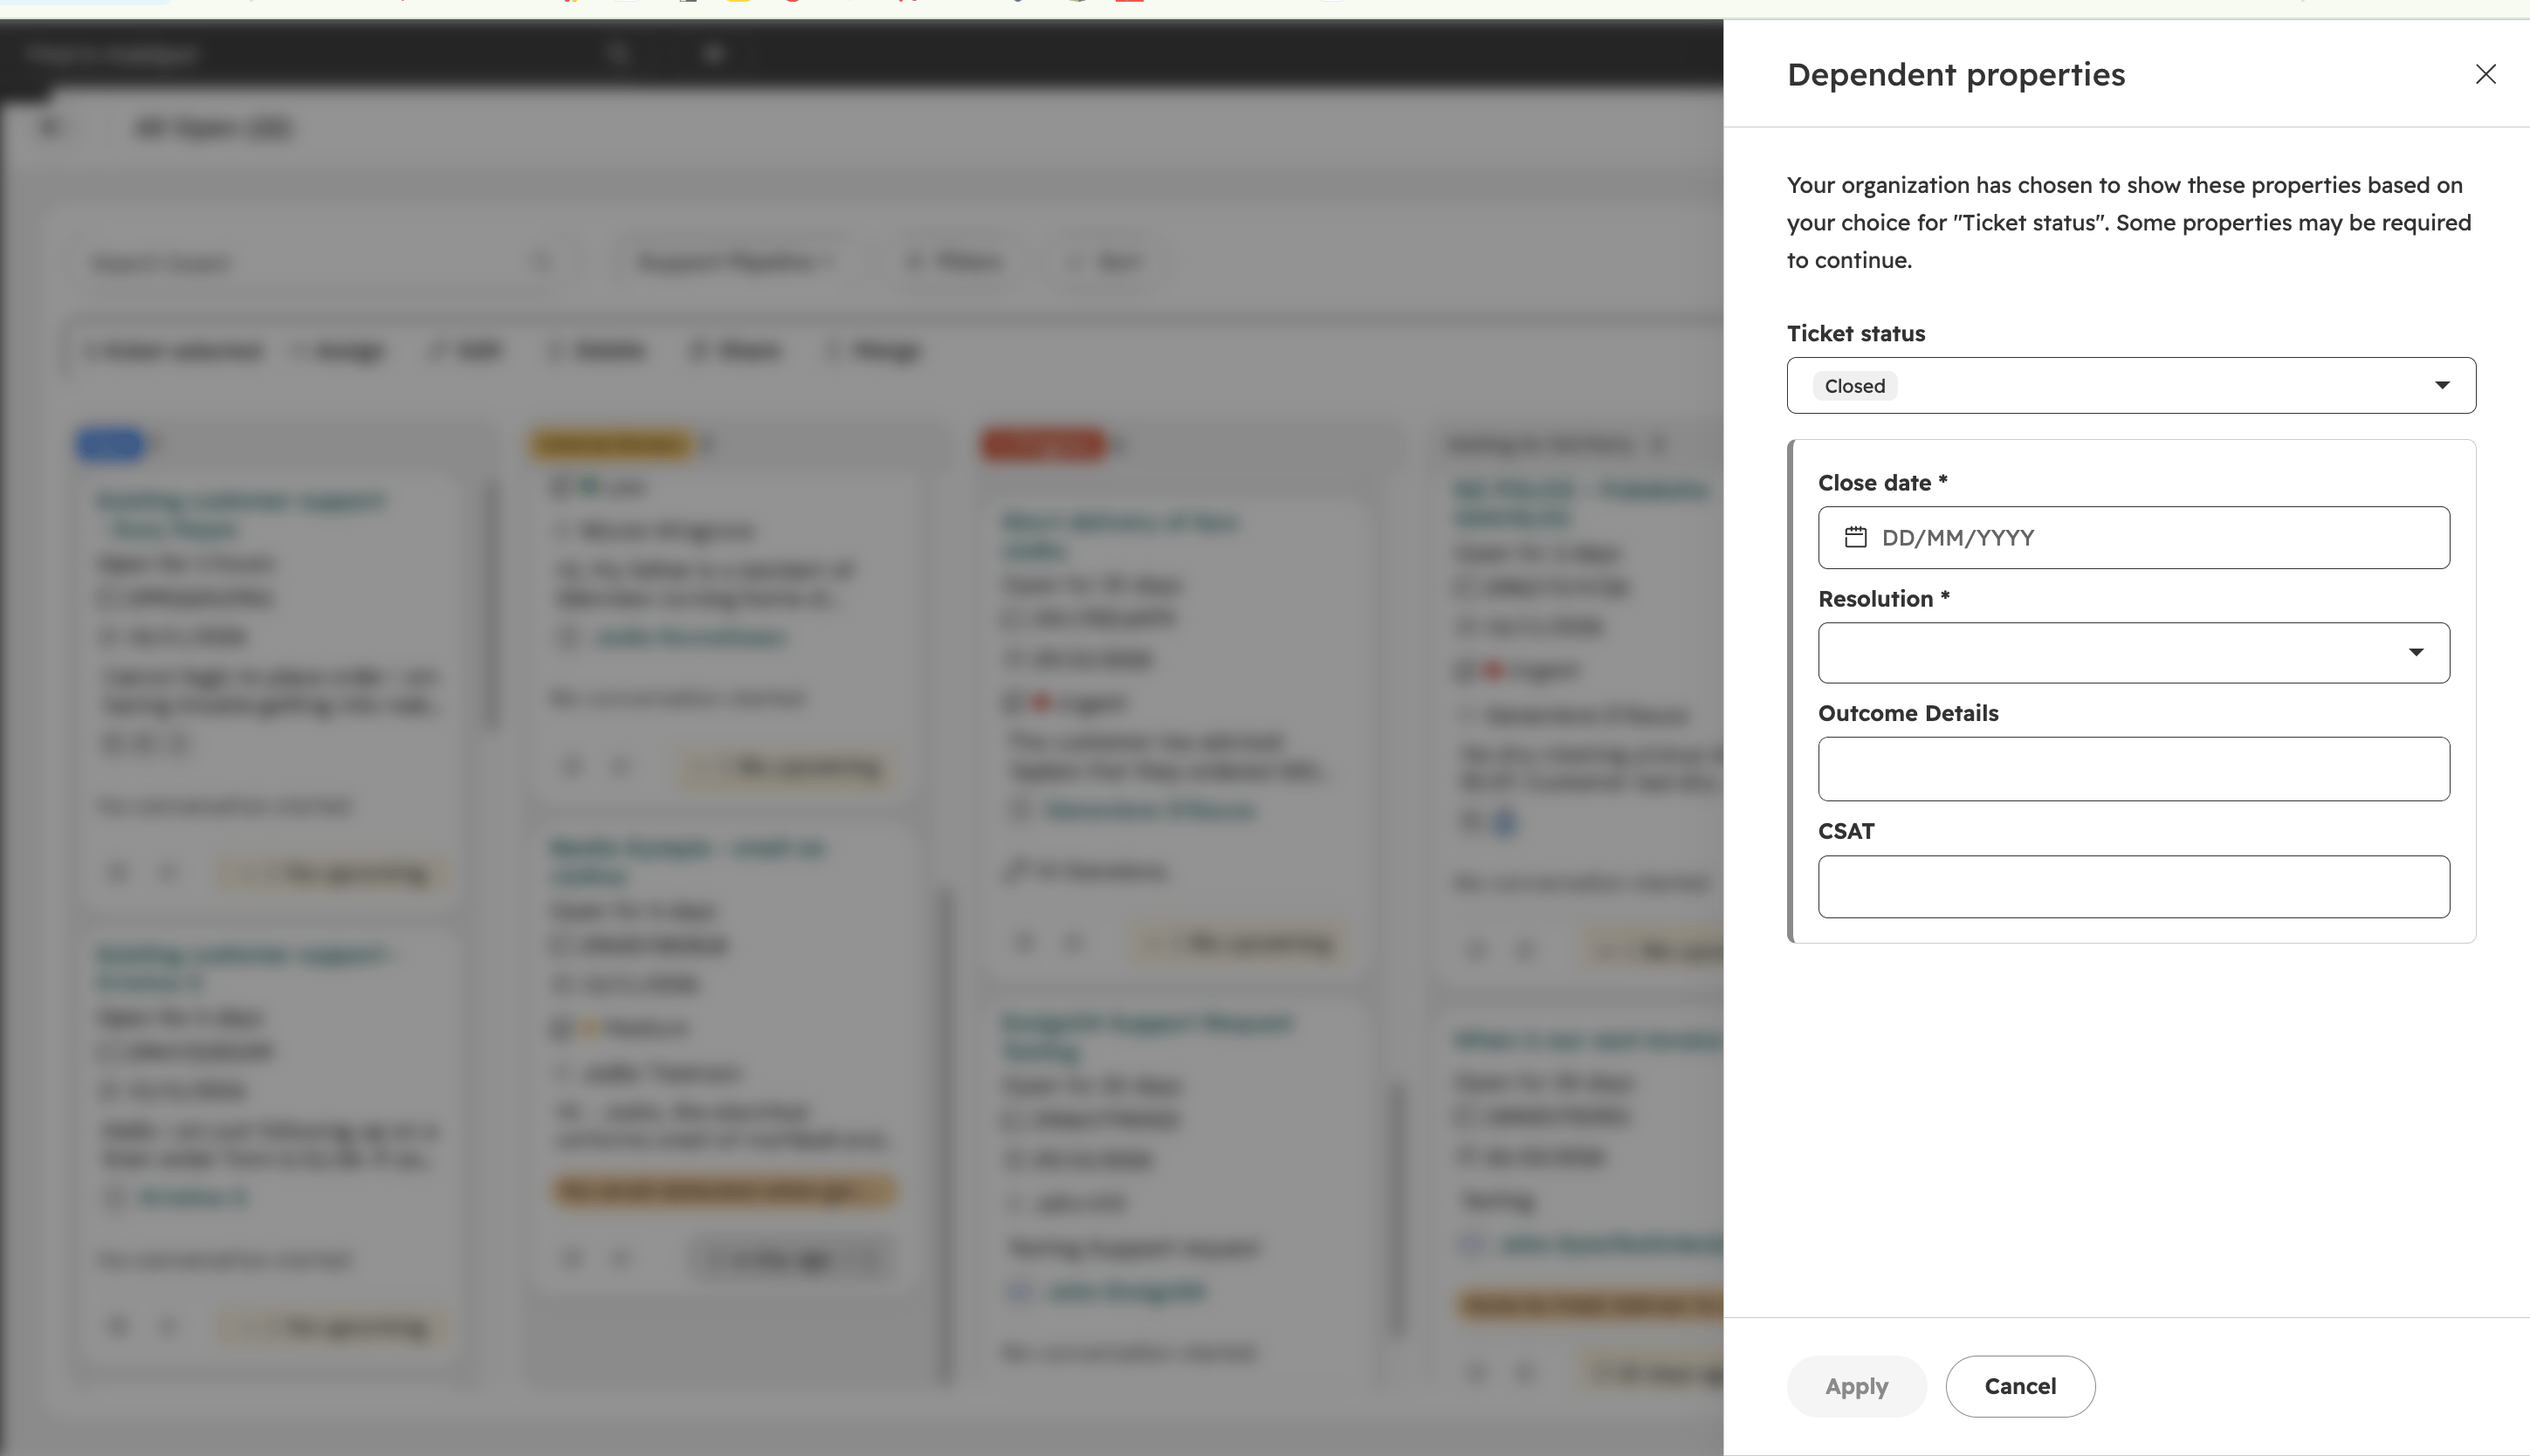
When the issue is resolved:
- Move the ticket to Closed.
- Fill in the closed date. This is required.
- Choose the outcome. This is required.
- Add outcome details so the next person understands what was done.
- Click to save.
The outcomes you can choose from are:
- Special delivery required
- Customer to place new order
- Customer cancelled order
- Customer will wait until next delivery
- Customer will pick up from laundry
- Driver has actioned
- Account manager has actioned
- Customer care has actioned
If the ticket uncovered a sales opportunity, let the account manager or sales know so they can follow it up.
You can also record the customer's CSAT score on the ticket once you have it.
How the team uses the information
What you record on tickets feeds our service reports:
- Monthly ticket volume
- Open tickets by stage and owner
- At-risk and overdue tickets
- Average time to first response
- Average time to resolution
- SLA reports
Service user checklist
- [ ] I can open the Help Desk and see my tickets
- [ ] I know how enquiries come in and which ones create a ticket automatically
- [ ] I know how to create a ticket from a contact record
- [ ] I always associate the ticket with the company as well as the contact
- [ ] I know the five ticket stages and what each one means
- [ ] I know which details are required at each stage
- [ ] I set an owner and a priority on every ticket in Internal Review
- [ ] I know where to see the SLA timer
- [ ] I know how to close a ticket with a closed date and an outcome
- [ ] I know what to do if a ticket turns into a sales opportunity
Admin notes (remove before sharing)
- Source: This page now follows the Ensign Data Collection Handover sheet, where the ticket tabs are approved by Ensign. The Miro "SP - Customer Care Process", "Help desk setup", "Inbox setup" and "Entry process / channel" frames were used for the shared email, phone and triage steps.
- Stage name: The sheet calls the first stage New. The Miro design calls it Submitted. This page uses New.
- Priority: The sheet uses Low, Medium, High and Urgent, and asks Ensign to confirm whether to keep the HubSpot defaults or use a custom set. The Miro had seven levels, including Critical, Severe 1 and Severe 0.
- Outcomes: The sheet's outcome list replaces the Miro's Account manager opportunity and New lead outcomes. There is no automatic handover to sales from a ticket, so the guide tells the user to let the account manager or sales know. Confirm that is what Ensign wants.
- Customer request form: The sheet says this form is not built yet, and asks if it can be used for both Ensign and Taylors. Update the page and add the form link once it is live.
- Drop-down lists still to confirm: Department and service point location options are not defined in the sheet. The case type list in the sheet also has duplicate entries, so clean it up before it goes live.
- SLA targets: No Ensign response or resolution times are in the sheet or the Miro. The sheet only says the tier is carried onto the ticket for SLA and reporting purposes. Add the agreed targets.
- Routing: The sheet sets out three phases (manual, then by state, then Tier 1 to account manager). Routing by department, brand and service point is flagged for confirmation. Monique also asked in the Miro whether existing customers go to the contact owner.
- Exclusion emails: The sheet lists two internal sender addresses that should be excluded from customer care tickets. They are not mentioned in this guide.
- TRS number and NetSuite number: Confirm what these are and when they should be filled in, so the guide can explain them.
- CSAT: The sheet has CSAT as a number on the ticket. Confirm when the CSAT survey is sent and who receives it.
- Reporting: The sheet's Reporting - Tickets tab is blank. The report list on this page comes from the Miro. Confirm Ensign's top five metrics.
- Knowledge base: Confirm which knowledge base articles exist, as coverage was raised as a gap in the Miro.
- Other channels: The Miro also lists account management meetings (the JSR), the internal WhatsApp used by drivers and porters, and Project Green notifications. These are not covered here yet. Chatbot is also not covered.
- Help Desk link: Add a direct link to the Help Desk in the Ensign portal.
- Screenshots: Every red bold "IMAGE FOR SARAH" note on this page says which screenshot is needed. Every image on this page is new. Delete each note once its image is in place, and make sure no screenshot shows another client's data.